Sunday, October 31, 2010

More butterflies for Halloween


Variations on creepy...

Every year I add at least one little piece in pursuit of building something really elaborate and fun.

Saturday, October 30, 2010

Setting up for Halloween


Here's the house decked out for Halloween. I still have to decorate the porch but the yard and window are done. At night the crosses have electric tea lights to make them visible and the window is lit; it is really pretty.

Sunday, October 17, 2010

New cartoneria cat for Halloween!

A friend of mine posted a picture of a miniature Dia de los Muertos inspired cat figurine on his Facebook page and it inspired me to make a full-size cat skeleton. I wasn't going to do a cartoneria cat this year; my first priority was butterflies followed by another pair of cartoneria skeletons. I have been unusually unmotivated this year and have now abandoned the idea of the extra skeletons, but the cat will satisfy my craving for paper mache.

To start I made the wire frame using 16.5 gauge wire sold in the hardware store as "tie wire". It is cheap but has a greasy coating that will quickly turn your fingers black from handling it.


I learned my lesson from my first experience making skeletons: it is much harder to go back and try to force wires through a finished piece of paper mache than it is to incorporate the wires in the first place. If you are going to make something that will be suspended in the air, go ahead and plan for that from the start! For my skeletons I made each piece separately for flexibility in posing and ease of storage but with this cat I don't think that will work, so I am making a fixed figure that will likely have to be stored outside of a box. Oh, well.

Then I built up the figure using well-crumpled newspaper and pieces of masking tape.


Next will be the application of glue soaked strips of newspaper...

Saturday, September 25, 2010

Butterfly decorations for Halloween


Because butterflies are something you think of for Halloween decorations, right? Well, maybe not.

My goal is to make my Halloween decorations a little more elaborate every year. This year I am making butterflies to hang up on my porch or wherever seems interesting. I cut the basic butterfly shapes out of 1/8 inch tempered hardboard (Masonite) using a bandsaw, then coated one side with store-bought acrylic gesso. Now I am painting the butterflies in bright colors. It is a fun project and a great way to reactivate my rusty painting skills.

My goal is to make them pretty, but somewhat creepy. Am I succeeding?

Monday, August 30, 2010

Progress on refinishing an old desk chair


My favorite part of finishing wood is being finished with it. I'm a ways away from that now so I had better suck it up and keep working.

After I finally finished sanding I wiped it down with a cloth and mineral spirits to get the dust off of it. Then I applied two coats of Varathane brand oil-based stain in a color they used to call "Mission Oak" and now call "Gunstock". I applied the second coat two hours after the first. There are a few really deep scratches that I left because I would have had to sand away a ridiculous amount of wood; besides, it is an old chair so having some character is OK with me.

I could not for the life of me find my blonde shellac flakes and I was really upset because I want to keep up the momentum and get this chair finished. So I used some of my garnet shellac for the first coat of shellac. I had planned on using some after doing a first coat of blonde, now the order is just rearranged a bit. It looks a little bit shiny, enough to notice a difference but a long ways from where I want it to be.

Doesn't it already look better than the "before" picture!?

To be continued...

Monday, August 16, 2010

Refinishing an old chair


I bought this old desk chair at the same time I bought the church pews. It's a great old chair but the photo doesn't do justice to the poor condition of the finish. It was pretty scuffed and scratched. I have been working to get the chair in better shape. Here it is as it was when I bought it (on the left) and here it is now (on the right). Once the stripping and sanding process is finished I'll stain and varnish it and it'll be ready to come in the house.

Saturday, July 24, 2010

Time to prepare for Halloween


Halloween is my favorite decorating holiday of the year. Ever since the time I was a child trick-or-treating and came across a neighbor's yard decorated like a cemetery I was smitten. In my growing up years (and beyond) it was one of my dreams to have a house with a front yard in a neighborhood where I could decorate and people would come by the house on Halloween. Now I have that yard, and I decorate it. Every year I work to make it a little better.

It takes months of preparation, working intermittently when I am not at work or doing other things, to make more decorations. In 2008 I made some tall skinny crosses for a graveyard. They look great, come apart for easy storage, and are useful for a variety of Halloween themes.

How I made them:

I used inexpensive 1 x 2 inch lumber, cut the pieces to desired lengths for the cross shapes, then used a dado blade in a table saw to quickly cut lap joints. I allowed some slop in the joints to account for the space taken by the paint.

To get the aged look I first painted all the wood black. Then I painted it with a crackle glaze I purchased at the hardware store in the paint department. Finally I painted the wood with a very light gray paint. White paint would have been too bright for the aged look I was attempting but the grey appears to be white but is not too bright.

In the picture below I have three pieces of wood. One is black with the clear crackle glaze, the middle piece is wood that had just been painted with the light gray but has not started to crackle, and the third piece is a piece that has been painted and partially dried and crackled.

Monday, July 5, 2010

Anatomy of an antique church pew


As mentioned in a previous post, I bought some 100 year old church pews from a Church in San Francisco that is remodeling. All they had left were the longest pews at over 20 feet. That is too long to be useful, or even to transport, so I cut them in order to load them on a trailer and now they are at my house.

I always like to see how things are made, and my cutting of the pews allowed me to see how they were constructed; it wasn't what I might have guessed. Because the pews were centered around an altar in a corner of a room instead of the front (do Methodists call their center of attention an altar? I don't know), the pews were built curved to fit the room. I imagine there was some industrial steam powered wood bending machinery involved. What I thought interesting is that they appeared to have made a "lumber sandwich" and instead of using 3 pieces of wood they split one piece in two and sandwiched a different wood inbetween. That way the grain is the same on the front and back of the finished bench. What a thoughtful method of construction. Not like the frankenlumber you see today in furniture. Also note that the thicker top of the bench back is different pieces fitted together. The seat of the bench is small pieces fitted together and shaped for comfortable sitting.

My plan is to leave one end of each pew intact, saw to desired length, then attach another end to the other side, resulting in something that looks like the original, only shorter. The person selling the benches told me there were a bunch of shorter ones that fit in corners, but all the shortest ones were the first to go. Only the long ones remained as they were only useful to someone with access to a woodworker. So here I am, the "junior woodworker" as my BF calls me; ready, willing, and hopefully able to take this project. I've set myself a deadline for end of summer to get this done. Luckily the finish has a lovely patina that I don't want to mess with. I'll have to repair some scratches and scrape the gum off the underside and not much else.

Tuesday, June 15, 2010

I have a forge!


Can't put too many irons in the fire unless there is a fire, right? Here is my new little Champion coal forge. The bed is only two feet square, big enough for most of what I will do and is portable and not a space hog. It has a hand crank air blower although the guy I got it from is also going to give me a motor which I can connect to the blower via a belt and run the blower off electricity if I want. The refractory needs to be replaced and it will be almost ready to go!

Now I just need to figure out where in the yard to put it, things are a bit crowded.

Saturday, June 12, 2010

Garden progress


Luckily the garden doesn't take as much time as most of the rest of my interests, especially if the BF is doing the vegetable planting. A lot of progress compared to when I last updated!

Saturday, May 29, 2010

Maker Faire


I volunteer with a non-profit industrial arts organization in Oakland called Kinetic Steam Works, and last weekend we went to Maker Faire. If you've never heard of Maker Faire, it is a kind of geek DIY festival with all sorts of stuff that people make, from musically synchronized Tesla coils to art cars to giant pyrotechnic sculpture. If you make something, you belong at Maker Faire. Our organization brought a 1917 Case traction engine and other steam engines and etc. We had a setup where a small steam engine was used to power a snow cone machine, thus creating steam-powered snow cones.

My part of Maker Faire prep was to improve our signage and merchandise display. My BF and I built these metal stands out of steel tubing and catwalk material, and I painted signs for merchandise prices and the snow cones. The signs are painted on masoninte (tempered hardboard) with gesso and acrylic paints. I used dowels as pegs to hold the individual numbers so we could change prices around if desired. I used the same technique to attach the listed flavors of snow cone. That way if we ran out I could just pull the sign for the flavor; I can also change flavors if we get different flavors in the future. This isn't the best picture, but it is the only one I took of the display and it shows everything together. That's not me in the picture by the way, it is two of the KSW crew, Laurel and Dan.

My display items helped our setup look better, but the real stars of the show were the traction engine and the snow cone machine built by Troye, shown here in progress in our backyard.


Another crew member, costume designer Bree Hylkema, made the lovely tablecloths.

Saturday, March 20, 2010

100 year old church pews woodworking project


A church in San Francisco is undergoing a major renovation and getting rid of the old pews as part of the renovation. The church was first built in the 1800s but destroyed, along with much of San Francisco, in the 1906 earthquake. The church was rebuilt after the earthquake and has not been renovated since. The person who sold me the pews wasn't able to tell me much about them except that the cushions had been in use since when she became a member of the congregation since the 1960s.

The pews are oak and slightly curved. A cross section of the pews shows that the seats are made of many slim boards glued together while the seat backs are of thick flat sawn lumber that was sawn into thinner boards then laminated back together with a thin piece of a different wood in between. This was done in order to curve the wood, likely with some industrial steam bending machinery.

The cushions are a nice red cotton upholstery weight velvet stuffed with what looks like a mixture of hair (horsehair?) and shredded textile (wool/cotton?).

My plan is to remove one end of the benches, cut the benches down to a size I can use and put the ends back on, ending up with a bench that looks like the original, only shorter. I will then cut and re-sew the cushions to fit. I will also put the hymnal holders back on the backside of the benches; I think they are really cool.

I bought the last four benches even though I am only certain of where I will put one. I just couldn't resist because how often does one get the opportunity to buy 100 year old church furniture? And at $2/foot I couldn't beat the price. The longest bench was 22 feet so it only cost $44! The cushions were $5 each. What a bargain!

Now all I have to do is figure out where to store the things until I can work on them, and what to do with the extra leftover wood.

Monday, March 8, 2010

Garden Season Starting


A couple of years ago I took out my front lawn and replaced it with mostly drought tolerant plants, plus three 4 x 12 foot planter beds. I believe that lush lawns in drier climates are an environmentally unsound idea, hopefully to fall out of favor soon. My new yard provides a welcome place for butterflies and bees, some food for my table, some cut flowers for my house, and beauty to enjoy viewing.

In the picture you see the vegetable beds. I finished digging the front and rear left beds this weekend. This morning I planted hollyhocks and birdhouse gourds in the forward bed, just in time for a fortuitous rain shower. The back left bed will be corn; so far just the drip irrigation is in place, nothing planted yet. Other planned plants for this year: tomatoes, basil, cilantro, carrots, and ???. By the way, eating fresh corn from my yard has totally turned me off to store bought corn on the cob - there is really no comparison! Additionally, there is a rosemary hedge, and three fruit trees: lemon, orange and peach. This year we are also finally starting to compost, so next year the planter beds will have homemade compost added.

The nice thing about a wild looking garden is that it is possible to not care for it and it still looks like it is supposed to look. A lawn requires regular mowing, edging, fertilizing, etc; leave it alone for three weeks in the summer and it starts to look positively neglected.

I tend to do very little work in my garden in the summertime: clip roses, prune lavender twice, collect vegetables. Yet it looks good all summer long. There are about four times a year that I spend a lot of time in the garden: late winter (now), late spring, fall, and winter. Now is the biggest work time of the year: time to dig out vegetable beds, do a major weeding and application of new mulch, replace clogged drippers, and replace tired/boring/non-performing plants. Late spring will be time for a major clipping of spent blooms: rose, lavender, and daisy; plus some weeding. Next is the late summer/early fall major spent bloom clipping and pulling of spent vegetable plants. In January I prune everything back that needs it, especially roses and lavender, and start thinking about what I want to plant next season. In between these major work times I do the occasional clipping and puttering when I feel like it, but I can easily go a month or six weeks at any time of year doing absolutely nothing and get away with it - try that with a lawn!

Plant Selection and Layout
My philosophy about a garden is that all the plants should serve a purpose. They must look pretty, smell pretty, or be edible or otherwise useful. I have plants that bloom in late winter/early spring, some that bloom in summer/fall, and some that bloom all year until I prune them in winter. The planter beds are in the middle of the yard, with plants and flowers on either side so that one can see flowers when viewing the yard from either the house or the street. Having plants on the front side of the planter beds seems to be working as a deterrent to casual theft from passers-by. In two years we haven't had any problems.

Watering
All the plants must be able to tolerate minimal to no additional water once established. The first year we watered everything regularly so the plants could develop good root systems. Last year we only watered once, but all the plants did very well except the roses. Those still produced blooms all year but did seem less disease-resistant. This year I will water the roses weekly and the rest of the yard not at all (except the planter beds, of course).

Continuing Education
This whole project has been a big experiment. I hadn't lived in a place where I could garden for many years, and never my own place where I could decide what to do. Having an experimental mindset has made everything much more relaxed and enjoyable. I'm not afraid to pull up a rosebush that doesn't bloom as advertised, or a plant that gets too big or just starts to bore me. My yard is small so if I had a set of plants I was dedicated to keeping I'd never get to try anything new. Trying new things is part of what keeps gardening interesting to me.

Why the Front Yard?
The way my house is placed on its lot gives me morning to mid afternoon sun in front, and later sun in back. The way we live is to spend more time outside in the back where there is more privacy. So it makes sense to dedicate backyard space to areas to eat outside, barbeque, and relax. Also in my household things like working on antique steam engines and woodworking happen in the back. With a hardscape area and a couple of trees in back there is less sunny space for planting even though the space is bigger. In short, the sun and the underutilized space in front made a front garden a sensible idea.

Friday, February 12, 2010

Learning a new skill: woodcarving


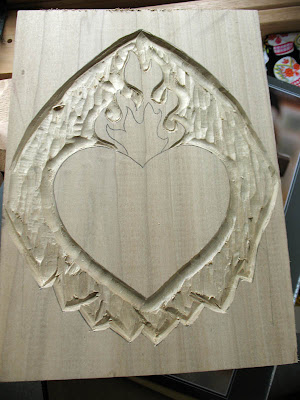
I enrolled in a woodcarving class. I previously tried experimenting on my own after reading books but I did not feel confident. We were each given a chunk of poplar and asked to come up with a design on the spot so we could begin carving that night. I made this simple design that I thought would be enough of a challenge so I could learn but easy enough to finish in the duration of the class. This is the result of about 2 hours of carving.

First, we drew the design on paper. The design was then transferred to the wood using carbon paper. The first tool used on the wood was a parting tool (a V shaped gouge); this tool was used to outline the design. Next we started carving deeper with a gouge. A shallow gouge will be used to refine. At some point I will be familiar enough with these tools to call them by their proper names, sorry I haven't been more specific now.

Sunday, January 17, 2010

An Edwardian Ball dress


I am going to be serving tea in the Kinetic Steam Works "Arsenic and Old Lace Tearoom" at the Edwardian Ball next weekend in San Francisco and I needed an outfit to wear. I've never been to an Edwardian Ball so I looked at pictures from past events to see how period accurately people are dressed. The answer is not at all - there's lots of stuff that is really earlier Victorian, some steampunk, and some just plain weird. Knowing that made it much easier to put my outfit together because I can do a period look without worrying about being completely period correct.

I didn't have any patterns and wasn't willing to lay out money to buy one. I wanted to make this dress as cheaply as possible but still have it look nice. I decided to go with a daytime look, even though it is an evening ball, because I am primarily going to be a cafe worker, not a ballroom dancer. Coincidentally, daytime clothing type fabric is less expensive and I admit this was my primary reason for choosing it. I also didn't know what I was doing and if the outfit was a colossal failure I would be out less money.

I spent one week net surfing to come up with a rough design and one week actually sewing (I seem to specialize in the "one week wonder" dress).

For the skirt I chose to make a five panel skirt because it was simpler to sew than a seven or nine panel skirt. The front is flat, just a couple small tucks. All five panels are roughly trapezoidal. The side panels have a tuck to accommodate my hips. The back panels are pleated to the center back to create some "pouf". I practiced making the skirt by making a petticoat first, it is made exactly the same as the skirt except it opens to the side. The skirt opens in the back and has a zip to make it easier to get into.


I was very anxious about making the jacket as I have no experience with that kind of tailoring. A few unsuccessful trial pieces ended up on the scrap heap and by the end I had abandoned my ideal of perfection and was taking shortcuts, skipping all the hand sewn finishing I had planned. The front gapes open but since the pigeon breasted look was fashionable at this time and I planned to sew a poufy blouse I decided I could live with this. Lucky me I wasn't doing Victorian!


The blouse is a yoke top with stand up collar, fitted waist and cuffs, and everything loose and bloused in between. Both the sleeves and bodice are gathered at the top and bottom. There is a zip on the side inside the side seam and one in the yoke in the back. This lets me get head through the top and saves me from having to sew buttonholes, which my ancient sewing machine doesn't do and I really really hate to do by hand (plus it was a big time saver). All the machine topstitching is covered with the wonderful velvet trim.


I will be wearing a corset, one that I made a couple of years ago for a Halloween outfit. I used the Custom Corset Pattern Generator (thank you Drea Leed!) to make a fairly generic corset. The important thing is that is makes the outfit look better, and because I am wearing it I stand up straighter. This helps me look more period I think. Modern slouchiness will ruin the most perfectly period outfit.

The corset is made of cotton canvas and boned with the bones of the plastic whale (aka zip ties). I have seen a real vintage whale bone, and it is remarkably similar to a zip tie.

Materials: sourced from the Scary Fabric Store (really Fabrics R Us in east San Jose). If you've ever been to a fabric market in Asia, that's what this store is like. Bolts are piled high, inventory changes so check back often, prices and content rarely marked. But you can get good deals there, and it is getting harder and harder to find good dress fabric at the mainstream fabric stores, so sad.

$10 Heavily starched white poly/cotton, 3 yards @ $3/yard (I included tax estimates in my totals)
$23 Red mystery fabric, content unknown (probably poly/cotton), medium weight, 7 yards @ $3/yard
$15 Black mystery fabric, content unknown (probably poly/cotton, medium-heavy weight, 3-4 yards @ $4/yard (I used this for
interlining, mistakes, and an idea I abandoned)
$37 3/4 inch synthetic velvet trim, 22 yards. The first time I was charged $2/yard, the second time I was charged $1/yard.
That's how it happens sometimes at the Scary Fabric Store.
$14 Black blouse fabric, a very light, slightly translucent mystery fabric (probably poly/cotton), 4 yards @ $3/yard

Total: $99

I made so many mistakes with this oufit, I could spend an hour pointing them out. But overall it looks good, it fits me well enough, and I am pleased.

Sunday, January 10, 2010

Because I have so many irons in the fire I needed a new fire, hence a new blog

I decided to start this second blog because not all the arts and crafts I do are medieval and I'd like to keep my original blog, Medieval Arts and Crafts, limited only to things medieval. My medieval blog has been very helpful to me in keeping track of what I am doing, seeing my progress, and deciding what I want to do next. I hope this new blog will be similarly helpful.